
Reliability · Editable reference architecture
Backpressure handling architecture
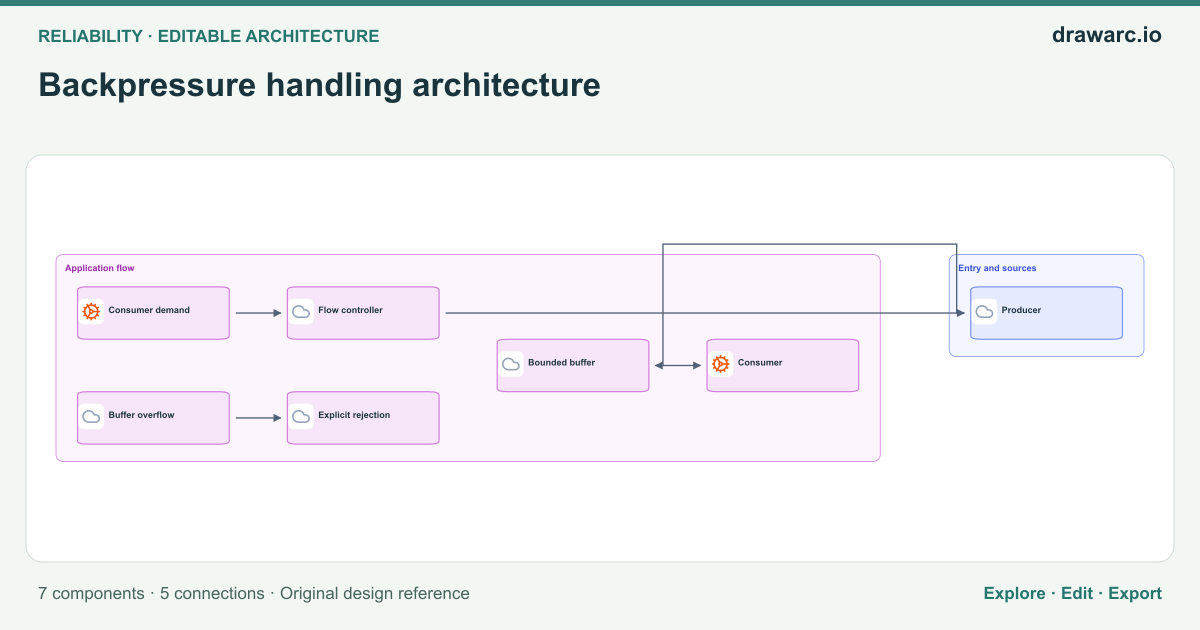
An editable backpressure handling architecture reference showing Producer → Bounded buffer → Consumer. Bound memory and expose overload honestly.
Open & Edit in DrawArc (Free, No Login Required)Your changes stay in a separate draft on this browser. Download an editable project to keep a portable copy.
7 components · 5 connections · Open the editor to zoom, move nodes and edit source.
Architectural overview
Backpressure handling architecture addresses the responsibilities and boundaries shown in this reference rather than prescribing an entire production deployment. The primary flow starts at Producer and reaches Consumer through Bounded buffer. Use this view to explain which component initiates work, which component owns a decision, and where a dependency can affect the caller. Bound memory and expose overload honestly.
The diagram contains 7 distinct components and 5 directed relationships. A separate path connects Consumer demand → Flow controller → Producer. A separate path connects Buffer overflow → Explicit rejection. These arrows describe logical interactions; they do not establish authentication, network access, atomic transactions or delivery guarantees. Label the actual protocol, payload contract and owner when adapting the drawing to your system. Keep synchronous and asynchronous boundaries explicit so that a reviewer can identify where a request ends and a later operation begins.
Before implementing this architecture, define expected load, data classification, latency budgets and recovery objectives. Give Bounded buffer a bounded dependency timeout and a documented failure response. Assign ownership to any state or external service added during implementation. Validate the decision above against your workload instead of treating the presence of a component as proof of reliability. Open the editable canvas, replace generic labels with real deployment units, and document the decisions that differ from this reference.
The real-world problem
Design or explain backpressure handling architecture with explicit ownership and dependency paths. Bound memory and expose overload honestly.
Data flow
Connections from this diagram. Branches and control signals are not a single chronological sequence.
- Producer → Bounded buffer. Define the interaction contract and trace the resulting response or state change.
- Bounded buffer → Consumer. Define the interaction contract and trace the resulting response or state change.
- Consumer demand → Flow controller. Define the interaction contract and trace the resulting response or state change.
- Flow controller → Producer. Define the interaction contract and trace the resulting response or state change.
- Buffer overflow → Explicit rejection. Define the interaction contract and trace the resulting response or state change.
Security boundaries
- Authenticate callers at the boundary before Bounded buffer accepts protected work; authorize the specific operation rather than trusting network placement.
- Use separate service identities and least-privilege permissions for Bounded buffer, Consumer, Consumer demand. Encrypt sensitive traffic, protect credentials and avoid placing confidential payloads in logs.
- Validate untrusted inputs and restrict administrative/configuration endpoints separately from the main flow.
Failure handling
Bounded buffer is unavailable or slow
Response: Apply bounded timeouts and controlled backoff only where retrying is safe. Return an explicit failure or durable acceptance; do not report success before required work is committed.
Verify: Interrupt Bounded buffer in an isolated test and measure errors, recovery and any repeated side effects.
A dependency repeats or drops a request
Response: Use operation identifiers and explicit acknowledgement/reconciliation where needed. Verify idempotency before enabling retries.
Verify: Exercise the failure path with representative records and verify both the visible response and the resulting state.
An invalid or incompatible input reaches Bounded buffer
Response: Validate the input contract before effects are committed. Preserve rejected input identifiers without exposing secrets, and document a safe replay or correction procedure.
Verify: Send malformed and older-version inputs through Producer and verify rejection, observability and unchanged valid state.
Trade-offs and alternatives
Bound memory and expose overload honestly.
- Benefit
- Makes the ownership and interaction boundaries visible for a focused design review.
- Cost
- The 7 illustrated components still require contracts, monitoring and operational ownership; extra boundaries can add latency and failure modes.
- Alternative
- Use a simpler deployment when it meets the same requirements, or split a boundary only after measuring a specific need.
Logical boundaries versus deployment units in Backpressure handling architecture
- Benefit
- Keeps the responsibilities of Producer, Bounded buffer, Consumer visible without requiring a separate server for each box.
- Cost
- A logical view does not establish isolation, independent scaling or high availability; those require a separate deployment design and operational tests.
- Alternative
- Co-locate components in a simpler deployment first when ownership and workload requirements permit it.
When to use this architecture
- Explain backpressure handling architecture to engineers or stakeholders using a concrete visual flow.
- Review this decision before deployment: Bound memory and expose overload honestly.
- Adapt a starting diagram for your own requirements, then record and validate every changed boundary.
Key components
- Producer
- Producer participates in backpressure handling architecture. Producer → Bounded buffer; Flow controller → Producer. Define its contract, owner and access permissions in your implementation.
- Bounded buffer
- Bounded buffer participates in backpressure handling architecture. Producer → Bounded buffer; Bounded buffer → Consumer. Define its contract, owner and access permissions in your implementation.
- Consumer
- Consumer participates in backpressure handling architecture. Bounded buffer → Consumer. Define its contract, owner and access permissions in your implementation.
- Consumer demand
- Consumer demand participates in backpressure handling architecture. Consumer demand → Flow controller. Define its contract, owner and access permissions in your implementation.
- Flow controller
- Flow controller participates in backpressure handling architecture. Consumer demand → Flow controller; Flow controller → Producer. Define its contract, owner and access permissions in your implementation.
- Buffer overflow
- Buffer overflow participates in backpressure handling architecture. Buffer overflow → Explicit rejection. Define its contract, owner and access permissions in your implementation.
- Explicit rejection
- Explicit rejection participates in backpressure handling architecture. Buffer overflow → Explicit rejection. Define its contract, owner and access permissions in your implementation.
Questions about this template
What does this backpressure handling architecture diagram show?
It shows 7 components with the core flow Producer → Bounded buffer → Consumer. Bound memory and expose overload honestly.
Can I edit this diagram without signing in?
Yes. Open the template in the browser-local canvas to change nodes, connections and source. AI generation and cloud account storage require sign-in.
Is this a complete production implementation?
No. It is an editable reference. Validate the security controls, dependency behavior, capacity and recovery plan against your own requirements before implementation.
Validate your implementation
Use the relevant platform documentation to verify service limits, supported features and configuration. This diagram is an original reference rather than a reproduction of a provider deployment.